 |
| Soup Beans with Crunchy Cornbread and Sweet Pickle & Pepper Relish |
Sunday, February 27, 2011
Soup Beans & Corn Bread with Sweet Pickle and Pepper Relish
Saturday, February 26, 2011
Firewood Frenzy!
Sorry no food post n a few daze! Very exhausting week- mentally & physically! Today was Firewood Frenzy! Very tired. Hot shower & vino are my sustenance tonight! I've got some pinto beans a soakin'. G'nite all!
Monday, February 21, 2011
President's Day Comfort Food
 |
| Bo Peep Pie |
Sunday, February 20, 2011
Smoked Butt and Friends!

While my butt was smokin :). I went ahead and prepared my beans, slaw and potato salad. The beans are from a recipe from Woody's Cook-in Sauce (this stuff is crazy, very intense, very very smokey, and Will loves it.) The only thing is that you just can't get Woody's anywhere. You can buy online, but if you live in Ohio take a trip to Jungle Jims in Fairfield Ohio, definitely worth the trip. To make these beans you will need: 2 16 oz cans pork n beans in tomato sauce, 1 med yellow onion chopped, 4 slices of bacon, 1/3 C Woody's, 1/4 C ketchup, and 2 tbs brown sugar. Start with frying your bacon until crispy, remove from pan and set aside. Pour off the bacon fat drippings and reserve all for this recipe and for the potato salad below. Add 2 tbs of the drippings back into the pan. Add your chopped onion to pan and cook until tender, not brown. Crumble your bacon and add to the pan with onions. Add your Woody's, ketchup, and brown sugar and mix well. Add your beans, bring to a boil. Reduce the heat and simmer for 15 minutes. These beans are really good, so get some Woody's and give this recipe a try.
This Kicked Up Cole Slaw is from Chef Aaron McCargo Jr, he was one of the Next Food Network Stars. It's really different and not overly sweet and has a nice kick to it. To make it you will need 1 16 oz pkg of slaw mix, 1/2 of a red onion sliced thin, 2 scallions thinly sliced, 1 jalapeno (seeds removed) thinly sliced, 1/2 of red pepper thinly sliced, 3/4 C mayonnaise, 2tbs sour cream, 2tbs white vinegar, 1tbs sugar, several dashes of hot sauce, 1/2tsp course ground black pepper, 1/4 tsp celery salt, pinch of cayenne, a pinch of kosher salt. Add all to a large bowl, mix it up and refrigerate for 30 minutes or so.
The Texas Country Potato Salad is a Paula Deen recipe and very simple too! It's different from the usual suspects, but really good. All you will need is 1 lb of small red potatoes (leave whole and don't peel), 4 strips of bacon cooked until crispy, 1 scallion thinly sliced, 1 boiled egg chopped, 1/4 C mayonnaise, 1tsp dijon mustard, S&P to taste. If you're making beans above, go ahead and fry 8 slices of bacon and reserve 4 slices for this recipe, don't forget you will need the bacon drippings for this recipe. Go ahead and bring your potatoes to a boil, add kosher salt and 2 tbs of bacon drippings to the water, and cook for 15-20 minutes until tender. At this time you can bring another pan of water to a boil for your egg. After your potatoes are done, drain them and let them cool, and quarter them. Add your potatoes to a med bowl, add the chopped egg, onion and toss. Add mayonnaise, mustard and S&P and mix, add your bacon and toss one more time. That's it. We're going to serve all of these dishes along side our pulled pork. Mmm!
Saturday, February 19, 2011
Smokin' Butt
I don't know about you , but when the weather starts getting nice I like to do some BBQ'ing. Today we are having Smoked Pulled Pork, South Western Beans, Kicked Up Coleslaw and Texas Country Potato Salad. If you've never smoked a pork butt it is time consuming, but not difficult. All of these recipes are easy so give them a try. I purchased a 8lb Boston Pork Butt and I brined it overnight. Thebrine was easy, I just took 1 part water, 1 part kosher salt, and 1/2 part molasses (but you could use brown sugar too). I mixed it up in a large ceramic bowl and placed the butt in and refrigerated overnite, that was Thursday. The next day I patted my butt dry :) and I rubbed it :) My rub was a blend of 1 tsp of each ground cumin, ground fennel, ground coriander, 1 tbs of each chili powder, onion powder, and paprika. You just want to sprinkle it over the entire butt. I again refrigerated my butt overnite (ooh, that was chilly). Today when I got up it was ready to smoke. You can use many types of wood chips, but my personal favorites are applewood and hickory. I think the fruit woods infuse a milder flavor, where alder and mesquite infuse a very strong smoke flavor. I use hickory most of the time- it also gives a nice mild smoke flavor and it's very easy to find. Please note that the amount of chips you use depends on the size of your smoker and how much meat you are smoking. I typically use about 1.5 cups of wood chips that I soaked in water for about 30 minutes. We use a gas Brinkman smoker (it's small, but the perfect size for us) because we couldn't maintain temp with the charcoal smoker. Our smoker has 3 racks in the top part, and 2 bowls in the bottom for water and chips. You want to drain the wood chips and the add them to the lower bowl close to the flame and add your water to the other bowl which will sit above the wood chips. Since, I was only smoking 1 butt, I removed 2 racks and placed the butt on the rack in the middle. Close the door and turn the gas on. It takes some time to smoke a butt, around 10-12 hours for a 8lb butt at a temp of 210-225. You should check it around 10 hours, but please note you will need to add water to the water pan throughout the day. Also, the smoke will infuse the meat within the first hour of smoking so not necessary to add more chips. This is fun stuff, you should try it. BTW, you can purchase the smoker for about $170 w/ tax from Home Depot, but be prepared to calibrate your thermometer because it's off and you will need to restrict the gas flow, because at low it still may be too high.

, but when the weather starts getting nice I like to do some BBQ'ing. Today we are having Smoked Pulled Pork, South Western Beans, Kicked Up Coleslaw and Texas Country Potato Salad. If you've never smoked a pork butt it is time consuming, but not difficult. All of these recipes are easy so give them a try. I purchased a 8lb Boston Pork Butt and I brined it overnight. Thebrine was easy, I just took 1 part water, 1 part kosher salt, and 1/2 part molasses (but you could use brown sugar too). I mixed it up in a large ceramic bowl and placed the butt in and refrigerated overnite, that was Thursday. The next day I patted my butt dry :) and I rubbed it :) My rub was a blend of 1 tsp of each ground cumin, ground fennel, ground coriander, 1 tbs of each chili powder, onion powder, and paprika. You just want to sprinkle it over the entire butt. I again refrigerated my butt overnite (ooh, that was chilly). Today when I got up it was ready to smoke. You can use many types of wood chips, but my personal favorites are applewood and hickory. I think the fruit woods infuse a milder flavor, where alder and mesquite infuse a very strong smoke flavor. I use hickory most of the time- it also gives a nice mild smoke flavor and it's very easy to find. Please note that the amount of chips you use depends on the size of your smoker and how much meat you are smoking. I typically use about 1.5 cups of wood chips that I soaked in water for about 30 minutes. We use a gas Brinkman smoker (it's small, but the perfect size for us) because we couldn't maintain temp with the charcoal smoker. Our smoker has 3 racks in the top part, and 2 bowls in the bottom for water and chips. You want to drain the wood chips and the add them to the lower bowl close to the flame and add your water to the other bowl which will sit above the wood chips. Since, I was only smoking 1 butt, I removed 2 racks and placed the butt on the rack in the middle. Close the door and turn the gas on. It takes some time to smoke a butt, around 10-12 hours for a 8lb butt at a temp of 210-225. You should check it around 10 hours, but please note you will need to add water to the water pan throughout the day. Also, the smoke will infuse the meat within the first hour of smoking so not necessary to add more chips. This is fun stuff, you should try it. BTW, you can purchase the smoker for about $170 w/ tax from Home Depot, but be prepared to calibrate your thermometer because it's off and you will need to restrict the gas flow, because at low it still may be too high. Check out the final product. The pork butt has this dark crunchy crust and the meat is so tender and just falls of the bone. The meat closer to the outside of butt is a little dry, but as you dive into the middle of the butt the meat is moist, tender and yummy. Check out the sides that we will be serving with this on the next blog.
Friday, February 18, 2011
El Picante - Not A Winner!
If I were a restaurant critic El Picante wouldn't stand a chance. In the small town where I live a new restaurant opened and the buzz was how great it was. It had been open for a few months so we invited some friends to join us. Although they don't take reservations on a Friday nite the mgr was kind enough take ours b/c well I made a good plea. We arrived and the place was packed. One could barely enter or exit, and the design of the restaurant made it difficult to maneuver anywhere in the place. We were seated in a booth, which was also tight and uncomfortable. Every time we moved it sounded like we were breaking wind. Anyway, our server seemed rushed and rushed us to place our order, which took sometime getting to our table. The food arrived and the portions were huge and looked very appetizing. I ordered the spicy burrito which was filled with chicken, ground beef, cheese, rice and beans and smothered in a chipotle sauce and beef tips with a dollop of sour cream. Sorry, I forgot to take a photo. I was eating my burrito and I noticed what I thought was a kitty hair that may have come off of my clothing, but as I went to remove it, it kept getting longer and longer. Not a kitty hair!! Not my hair either!! Ooooh!!! I didn't return the food, it just wasn't worth it. As we were leaving, my neighbor who happened to be seated at a table next to our booth also said she found a hair in her food too, but hers appeared to be a facial hair. Ooh! It's unfortunate that this happened, because the prices were great, the food tasted good, the guacamole was fresh with chunks of avocado and the salsa was good, but I WON'T BE BACK!!!
Thursday, February 17, 2011
Chicken & Chorizo w/ Romesco Sauce and Spanish Potatoes & Kale

This dish is a Rachael Ray 30 minute meal (my A$$). I would say w/ prep and cooking at least 45 minutes, because there are many tasks involved. About the dish, Romesco sauce originated from Spain to accompany fish and it's made up of roasted red peppers, roasted tomatoes, almonds, stale bread, garlic, red wine vinegar and few other things. It has a lot of acid and a tangy flavor. Chorizo sausage if you're not familiar is a Spanish Sausage loaded w/ sweet paprika and spices. I really like it and use it often in many dishes. The mashed potatoes are incorporated w/ Kale and a Spanish cheese called Manchego from the La Mancha region of Spain and made from the milk of the Manchego breed of sheep. It's salty and similar to Pecorino Romano. I think the dish has a lot of bold and interesting flavors. Will suggested omit the chicken entirely, it really didn't add anything for him, but load up on the chorizo. The dish isn't bad, but I probably won't make it again. If you'd like to try it the recipe can be found on the food network. Buen Provecho!
Wednesday, February 16, 2011
Hurry it's Curry Time

I don't know about you, but I love curries. Sometimes curry dishes can take a lot of time, but the dish I made tonight is simple and quick. I would say no more than 40 minutes. This recipe can be found on the Food Network, I know you're shocked! It's called Curry Chicken Thighs. I prefer chicken thighs over the breast b/c they have more flavor and they retain their moisture. Let me share how to do this dish. What you need: a large skillet (not a non stick, they don't allow your meat to brown- unless you have a new Calphalon), 6 boneless skinless chicken thighs, 2 tbs veg oil, 1 tbs butter, S & P, 1 med onion chopped, 3 tsp curry, 1/2 tsp cayenne, 1 tsp cumin, 1 tsp cinnamon, 1.5 c low sodium chicken stock, 2 carrots peeled and sliced on the diagonal, 1 c broccoli florets, 1/4 c heavy cream, 3/4 c frozen peas. You will also need to cook up some basmati rice and if you can find it Indian Naan Bread. Add your butter and oil to the skillet and heat over medium heat until melted. In the meantime season both sides of your thighs w/ S & P, add them to your skillet and brown on both sides (about 4 minutes/side), remove thighs to a plate. Add the onions to the skillet and cook until they are tender, add the carrots to the skillet and coat them with mixture, addd the spices and mix it in w/ the onion and carrots and cook about 1 minute. Add the chicken stock and simmer 2 minutes, add the thighs and the broccoli to the skillet, cover and simmer over med low heat for 15 minutes. Add the heavy cream and peas and stir until mixed in. Serve over basmati rice w/ Naan bread. That's it! Enjoy!
The Winner of the Food War...
The suspense must be killing you, so the winner of the Cincy Chili War is SKYLINE!!!
Tuesday, February 15, 2011
Food Wars!

Cincinnati is famous for a few things and one of them is Cincinnati Chili. Tonight my honey is going to do a blind taste between two of Cincinnati's finest- Skyline Chili and Gold Star Chili. Empress Chili is a also a favorite in the Queen City, but we don't have one close to us, so we couldn't compare. Tonight I chose to taste the Cheese Coney. Funny story about cheese coneys, once when I was a child I went to a Dairy Queen in southern Kentucky with my uncle. When we got to the counter, he asked the girl for 2 coneys, the girl looked at him kind of funny and returned with 2 ice cream cones. My uncle wasn't too pleased, he had to explain to the girl what a coney was. Apparently, back then in the south a coney was not a hotdog on a bun with chili. Anyway, from the picture you can see that the coney on the left looks more appetizing than the one on the right. The right coney appears to have less cheese and little pieces of chopped onion on the top edges of the bun, it just looks sloppy! I tasted both and the right coney was saltier and had a stronger cinnamon flavor. Let's see which one Will prefers. He liked the bun on the left coney better, he said it tasted like it been basted in butter and toasted very lightly. The hot dog on the right coney had a smokey flavor and was larger and had better flavor. The chili on the right had a sweeter flavor. The cheese on the left coney tasted more natural, the cheese on the right had a powdery texture. Overall he liked the bun, chili and cheese on the left and preferred the hotdog on the right. The winner is......Why don't you try the test and let us know which one you prefer. Good Eats!
Monday, February 14, 2011
Valentine Dinner

Happy Valentines!! Steak or seafood or both are typical valentine foods, but I hate fish and Will doesn't really like shrimp, scallops or lobster, so steak it is. I made the steakhouse steaks which can found in a previous post. Although this time I heated my cast iron skillet on med not med high. Oh yeah, I wrapped applewood smoked bacon around the steaks this time too. So yummy, Mmm like butta!! With the steak I served bundles of asparagus also wrapped in bacon with a poached egg atop and a simple pasta. You know how to do the steak, so I lets move onto to asparagus. My bundles were huge, and I could've gotten four bundles out of the bunch, but hey, it's V-Day! So, I drizzled the asparagus with olive oil and sprinkled with Kosher salt and fresh ground pepper and I wrapped my bacon strip around the bundle. BTW, I preheated my Breville Toaster Oven to 400 degrees (don't knock the toaster oven this thing rocks-check out their website.) I placed them in the oven and I roasted for 25 minutes. While those were roasting, I started my water for my pasta and my poached eggs. I chopped up a handful of fresh flat leaf parsley and 2 cloves of garlic. When the pasta was finished cooking I added the garlic and parsley and 1/2 of a container of Boursin Cheese (see photo if you don't know what Boursin is). Boursin has such a delightful flavor and I use it a lot in pasta and potato dishes and it's great mixed with italian sausage and stuffed in mushrooms. I also reserved a cup of the pasta water and poured into the pasta so that that it didn't stick together and set aside. Poached eggs represent fertility, so why not it's V-Day? I poached the eggs for 2 minutes and just laid them atop the asparagus bundles. Mmm, so easy to do and so yummy. Ok, so that's it. The time to prepare this meal was probably 30-45 minutes and it was so easy. Once I plated the food, I sprinkled the pasta and the asparagus bundles with some parmegiano reggiano cheese and fresh ground pepper. The wine we served is a Cabernet Sauvignon called Educated Guess, price $19.99 a bottle. It has a lot of complexity and very smooth. This is a fun meal to prepare and it tastes great. Dessert are BonBon cupcakes from the Manna Cupcake in Lebanon Ohio. Bon Appetit.
Sunday, February 13, 2011
Chicken Stew

Tonight we made Ina Garten's Chicken Stew. There are a lot of steps in this recipe, so be sure to follow closely because it's very easy to make a mistake like I did. This recipe calls for homemade biscuits which I don't do. Anyway, I thought something was wrong with the dough, but since I never make biscuits I wasn't so sure. Anyway, the biscuit portion of the recipes called for 3/4 C half and half cream and I used 1 3/4 C of half and half. It was very very wet, but I had already placed the dough onto my surface. There was no way that I could roll out this mess, so I just kept adding flour until I thought it was at the consistency that a biscuit should have. Anyway, the stew turned out ok, but we both agreed way too oniony, I think this recipe would be better with 1 c of chopped onions and no baby onions. I didn't add the baby onions b/c I don't like them and it was still very oniony. You could also make this dish minus the biscuits and served over some Kluski Noodles. If you want to try this recipe just click on the link above and search chicken stew. It's not difficult, it just has some layers to it. I won't make this dish again, what a disappointment.
Mandarin Fried Rice
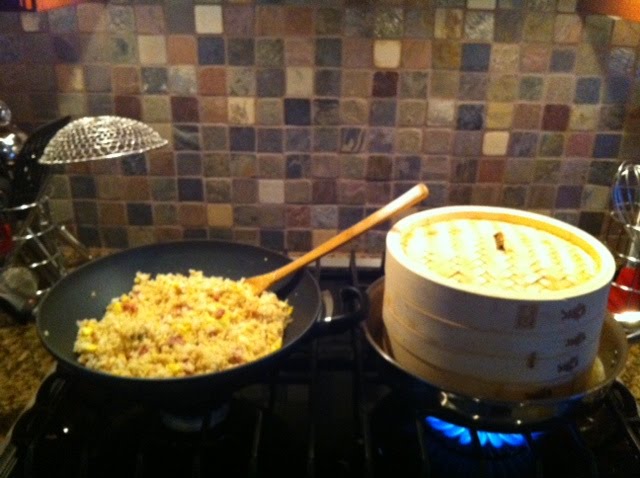
This recipe is from Ming Tsai a renowned Asian Chef. The recipe is very simple, yet the complexity of flavors are just incredible. I hope you will give it a try. You will need: canola oil, 3 eggs slightly beaten, 2 tbs minced garlic, 2 tbs minced ginger, 1 bunch chopped scallions, use only the white part, 4 strips of cooked bacon cut into 1/4" pieces, 8 C of long grain rice (can be made a day before, but if you make the day of it must be completely cooled), 3 tbs soy sauce, 1/2 tsp white pepper. In your wok, add your canola oil and soft scramble the eggs-remove and set aside. Add your bacon to the wok and fry but not too crispy, remove with a slotted spoon and set aside, with bacon drippings in wok add your garlic and ginger and stir fry for about 1 minute, add your scallions and cooked bacon and stir fry an additional minute, add the rice and mix thoroughly, add your soy sauce, white pepper and eggs and continue to mix. Serve immediately. This dish is great on it's own or you can serve with your favorite stir fry or with steamed dumplings. Jinjinyouwe!!
Shao Mai Dumplings

My honey loves steamed pork dumplings so last nite I made some with mandarin fried rice. If you've never made dumplings they can be time consuming, but the end product is better than most from a restaurant. I will give credit to ArLoi Dee Thai Restaurant in Mason, because they have the best that I've ever had. Anyway, this is a simple recipe, so if you have some time on a Saturday or Sunday you might want to give it a try. This recipe will make about 35 dumplings. You can deep fry them, but we prefer to steam ours. For the sauce you will need: 1/4 C soy sauce, 1 tbs sesame oil, 2 tbs honey, 1/4 tsp roasted sesame seeds, 1/4 tsp crushed red pepper, 2 tsp finely minced ginger, just mix it all together and set to the side. For the dumplings you will need: 1 head of Napa Cabbage chopped to line the bottom of your steamer 1 pkg of wonton wrappers (I use the round ones for this recipe, if you can only get the square wraps you will have to cut the edges, otherwise they will be too big and unsightly), 1 lb of ground pork, 1 can rinsed and drained water chestnuts finely chopped (I put them in food processor), 2 tsp grated ginger (you can use you a fine cheese grater for this), 1 tbs cornstarch, 1 tbs sesame oil, 1 tbs soy sauce, 1 tbs rice wine vinegar, 1 tsp kosher salt, 2 tsp sugar, 1/2 tsp ground black pepper. Mix all together by hand in a med size bowl. You will need a small cup of water to moisten the edges of the wrappers. Tools needed: some type of steamer- I like to use the bamboo steamer, a sheet train lined with parchment, a large skillet to immerse the bamboo steamer, 1 teaspoon, fork for pinching sides of the dumpling. Before we make the dumplings, go a head and line the steamer trays with the cabbage, place bottom tray of steamer into the skillet. Add water to the skillet until it reaches the middle of the bottom tray of the steamer. You will need to add more water between batches. Let's make some dumplings. Lay out 6 wrappers at a time on your surface (they tend to dry out, so that is why I only do 6 at a time), dip your index finger into the water and moisten the edges of the wrapper, take a spoonful of you mix and place in middle of wrapper, fold the wrapper over and with you fork pinch the edges together and place on your sheet tray. Repeat process until all of your dumpling mix is gone. You will have leftover wrappers, you can save them for later use. Next bring the water in the skillet to a rolling boil. In each steamer tray place 7-8 dumplings and make sure they don't touch one another. They need to steam for a total of 20 minutes, but 10 minutes into steaming you will need to rotate the trays. BE CAREFUL it is very hot, use your oven mittens for this. Once your dumplings are finished steaming, place them on a serving tray with your sauce. BTW, if you don't want to steam all of your dumplings you can store them in a sealed container in the refrigerator up to 7 days or you can freeze them. Sihk faahn!!
Friday, February 11, 2011
TGIP!!! Thank God Its Pizza!!

Hey Guys TGIP!! Fridays to me scream pizza, so tonight I made our homemade pizza. I'm not going into details on how to make the dough you can find that on my Pizza's in the House post. I just wanted to share that tonight for my ingredients I bought one of those roasted savory chickens at the grocery and removed the meat from the carcass. I used only the white meat and chopped it up. I chopped up 1 shallot, 1 jalapeno, I did a chiffonade of some fresh basil, sliced 2 garlic cloves and chopped up some bacon. I sliced a nice ball of fresh mozzarella and added extra shredded pizza cheese. Oh yeah, don't forget the sauce. I placed it all on my pizza dough and baked at 500 degrees on my pizza stone for about 10 minutes. Remember using the parchment really helps with placing and removing the pizza from the stone, plus clean up is much easier. Check it out it smells delish. Buon Appetito!
Wednesday, February 9, 2011
Brining Time!!

Brining is simple technique using salt, sugar, water and herbs and spices that allows the meat to retain moisture while cooking and gives it a really nice flavor. My brining career only encompasses pork, but I do plan on venturing into fowl and poultry. Anyway, I've tried several techniques and I found that they both give similar results. One technique asks that you simmer the water, salt and sugar mixture and allow to cool before placing the meat into it and the other calls for just mixing up your stuff and then adding your meat. With both techniques you allow it to sit overnight in the refrigerator. Why don't you try both techniques and let me know what you think? Anyway, brining typically calls for 1 part water, 1 part kosher salt and 1/2 part sugar and whatever herbs, spices or aromatics that you might like. Be conservative using garlic powder, it can give a bitter taste to the meat and be sure to chop up fresh garlic, onions and peppers if you are going that route. I had three nice sized pork chops (about 2" thick) and I placed them in a large glass bowl that I filled with 1 gallon of cold water, 1 C Kosher salt, 1/2 C Molasses, a tsp of each of cumin seed, fennel seed, coriander seed, 1 clove of garlic chopped and 1 bay leaf (of course I mixed it all up before adding the chops). I then placed the bowl in the refrigerator. Tonight when I got home I heated my cast iron skillet on med heat and preheated my oven to 425. I removed the chops from the brine mixture and patted them dry and rubbed all sides with a little canola oil and then sprinkled them with a little S & P on both sides. When my skillet was very hot I placed the chops in and browned all sides for about 5 minutes each. After browning I placed 1/2 tbs of butter onto the tops of each and then placed them in the oven until they reached a temperature of 140-145 degrees (they will continue to cook when you remove them from the oven). I then removed them from the oven and let them rest for about 5 minutes before I served them. They turned out really nice. A lot of flavor and very moist. I hope that you will give brining a try it really adds something special to the meat. Bon Appetit!
Tuesday, February 8, 2011
Dont Try This At Home

Pleeeeease don't try this at home!!! Tonight I went totally store bought and it SUCKED!!! Frozen Ravioli (Pierino) not good with a jar of Bertolli Marinara also not good. I tried to make it more edible with the addition of italian sausage, mushroom and parmigiano reggiano, but it still pretty much sucked. The only saving grace was that I made the bruschetta (I love you Mario). Guys if you haven't made Mario's bruschetta you gotta give it try. He has many variations and they can all be found on the Food Network. Sorry about the bad photo, my photographer is on assignment. Stayed tuned we are going to do some brining. Happy Evening!!
Monday, February 7, 2011
Fried Chicken First

My brother had asked, "how about some fried chicken?". I kind of cheated since we had the deep fryer ready from last nites fry fest. Btw, this is a Ina Garten recipe and she calls it baked fried chicken, it can be found on the food network. Anyway, I started with a chicken cut up into it's respected parts and I soaked them overnite in buttermilk. Tonight when I got home I preheated my oven to 350 degrees and my deep fryer to 360 degrees. I got out a sheet tray and placed parchment paper (makes for easy clean up) on the bottom and placed a baking rack on top of the sheet tray. I mixed 2 c all purpose flour, 1 tsp kosher salt, pepper, 1/4 tsp cayenne, 1/2 tsp paprika. I then dredged each piece of the buttermilk laden chicken into the flour mixture. Two pieces at a time I deep fried the chicken for about 4-5 minutes until golden brown. I placed the chicken pieces onto the baking rack on the sheet tray and I baked the chicken for 40 minutes until the internal temperature was at 17o degrees. While the chicken was baking I cooked up some yukon gold potatoes for 15 minutes or so. Once they were cooked thru and drained I added 1tsp kosher salt, 1tbs butter and about 1/4 c milk and mashed those babies up. I also steamed some green beans for a healthy touch. Not sure if I would do this recipe again, honestly not a big fried chicken fan.
Sunday, February 6, 2011
Fry Fest!! SuperBowl Sunday!!

We are having a fry Fest tonight!! All of these recipes can be found on food network. Giada's fried ravioli, Guy Fieri's double fried french fries, food network fried green beans and Down Home With the Neely's fried wings! You don't have to have a deep fryer, but it makes it easier. We use our Krups and it does a fine job. Check out our dishes! Wish you were here to share with us and to watch the game! BTW, fried chicken tomorrow nite Bro!
Friday, February 4, 2011
Mmm Magic Mac
This isn't a very pretty dish, but you know I was tired, hungry and in a hurry. I had 1lb of 93-7 ground turkey and I wasn't in the mood for turkey burgers. So, I asked Will what he thought and he said why don't you put it in with Velveeta Mac N Cheese. I know what your thinking, "Ooh! Cheese Food Subsititute" Wrong read the label it has milk and whey, cultured enzymes, it's really not that bad and the possibilities are endless. Rachael Ray ain't got nothin on me. Anyway, to make this very quick and yummy dish you will need: 1 lb ground turkey, 2 cloves chopped garlic,1 diced gn bell pepper, 1 diced med onion, 1 chopped jalapeno, 1tsp cumin, 1tsp dried basil, 1tsp dried oregano, 1 box of Velveeta Mac N Cheese (we even used the low fat version), a dash of Lousiana's Habanero Hot Sauce. Go ahead and get the pasta boiling and cook al dente of course. In the meantime, saute your garlic, peppers and onion until onion is translucent. Add your turkey and cook until there is no pink (be sure to break up the turkey with a fork or spoon), add your cumin, oregano and basil and stir. Add the Velveeta Cheese packet. Stir until all is blended. Add your drained Macaroni to the turkey and mix together. If you think it's to dry add a litte chicken broth or better yet if you have any boxes of Velveeta in your pantry cut off a big chunk and throw in there and blend until it's melted. Garnish if you like with a litte parsley. Serve into bowls with a dash or 2 of the hot sauce. Yummy!! And look how it blends in with the counter top!!
 |
| Mmm Magic Mac |
Tuesday, February 1, 2011
Lazy Day Lasagna
 |
| Lazy Day Lasagna |
Subscribe to:
Posts (Atom)